Protothreading with buttons

When using the buttons code to sense movement of a rack & pinion system the whiles for press & release seem to grab the processor and not allow protothreading.

Is there any way to get threading to work at the same time as waiting for buttons to be activated?

Hello, thanks for the message. Is this with regard to the Bricktronics software libraries for Arduino?

The BricktronicsButton example code does indeed use a single-threaded approach, however there’s nothing inherent in the library that makes it unsuitable for multithreaded operation. There are only the two status functions (isPressed() and isReleased()), both returning a bool true/false value based on the button’s current status. You could set up a periodic timer interrupt to query the button status and, say, set a BUTTON_CHANGED flag to be processed by a main loop thread.

If you want to directly access the corresponding pin belonging to the BricktronicsButton instance, you can use:
b._inputPin. Keep in mind that if you’re using a Bricktronics Shield, then the input pin number may be a special case (>64) that indicates that the pin is on the shield’s IO expander.

Hope that helps, but let us know if you need more information to get it working with your needs.

Thanks for the prompt response, I used Timer0.

Now looking to PWM the motor using the Bricktronics sheild. Are there any schematics anywhere?

I understand the pwm in the BricktronicsShield library, but all of the pins are referred to as Arduino. As some of the pins from the Arduino are being used already I want to avoid those.

Any ideas?

The motor PWM pins are just normal directly-connected pins, not using the I/O expander at all. The BricktronicsShield library is just a thin wrapper layer for the normal Arduino-style pin operations (pinMode, digitalWrite, digitalRead) that does something special for the pins on the I/O expander chip.

Schematics for all Bricktronics hardware are available here:

https://www.wayneandlayne.com/bricktronics/downloads/#hardware

UPDATE: Also there is a list of pin functions at the bottom of this page: https://www.wayneandlayne.com/projects/bricktronics-shield/design/

Does that mean that I’d need another L293D driver board with the Arduino fed PWM pin, or could the current on board motor driver be used?

I guess the MotorDriver board would be the easiest solution.

The schematics would be good if I understood them, but my understanding of circuits is rudimentary.

Hello, thanks for the reply. Schematics can certainly be confusing, no worries there :slight_smile: It might help if you explain what you’re trying to accomplish here, so we can provide the best support possible. What sort of Arduino-compatible board are you using with your Bricktronics Shield? What extra hardware is connected?

The BricktronicsShield and BricktronicsMotor software libraries should enable just about any Arduino-compatible controller to work with the supported LEGO motors and sensors. The L293D motor driver chip on the Bricktronics Shield is perfectly capable of driving two motors. However, the six pins used to control those two motors are fixed, so there’s no flexibility there if some of your pins are already in use by other hardware. The Motor Driver board is very flexible, in that you can connect each motor to any pins (as long as the speed pin has PWM support).

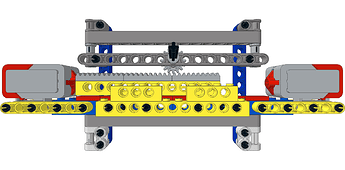
I’m setting up a pulley system with a rack & pinion, where there are 2 touch sensors at the limits of the rack (pulley removed from the image below).

I want to control the motor speed to make the rack traverse be at a certain rate, e.g. move from one end of the rack to the other in 10 secs, for example.

I have the motors reversing direction in response to the buttons, with an interrupt timer pinging when each of the buttons are expected to be pressed. I now need to get it all synchronised.

I have a Bricktronics sheild & megashield, and could use either.

Very cool project! If you’re using just a Bricktronics Shield or Megashield, then there shouldn’t be any pin conflicts and you should have no trouble using the BricktronicsMotor class to control the motor. Let us know if you have questions about how to get it working, or check out the examples included with the library.

It is the getting it working with PWM that I’m stuck on, I know the UNO can output PWM on pins 3, 5, 6, 9, 10, or 11, but only 9 & 10 are left available with the shield.

https://github.com/wayneandlayne/BricktronicsMotor/blob/master/API.md shows the control with the BricktronicsMotor shield, but not the Bricktronics Shield.

If I’m using a shield, and controlling the direction of the motor, how could I use either PWM remaining output to also control speed?

Hello, the BricktronicsMotor class is used for all the Bricktronics hardware, including the Shield, Megashield, and Motor Driver. It’s designed to hide all the complexity of PWM and direction controls, and lets you use higher-level concepts instead of configuring microcontroller timer registers and all that.

This example shows how to use the BricktronicsMotor code with the Bricktronics Shield: https://github.com/wayneandlayne/BricktronicsMotor/blob/master/examples/MotorSingle/MotorSingleBricktronicsShield/MotorSingleBricktronicsShield.ino

Here’s the non-comment parts of that file:

// Include the Bricktronics libraries
#include <BricktronicsShield.h>
#include <BricktronicsMotor.h>


// Select the motor port (MOTOR_1 or MOTOR_2) in the constructor below.
BricktronicsMotor m(BricktronicsShield::MOTOR_1);


void setup()
{
  // Be sure to set your serial console to 115200 baud
  Serial.begin(115200);

  // Initialize the Bricktronics Shield
  BricktronicsShield::begin();

  // Initialize the motor connections
  m.begin();
}

void loop() 
{
  Serial.println("Going forward.");
  m.setFixedDrive(75);
  delay(1000);
  
  m.setFixedDrive(255);
  delay(1000);

  Serial.println("Going in reverse.");
  m.setFixedDrive(-75);
  delay(1000);
  
  m.setFixedDrive(-255);
  delay(1000);
}

Direction control doesn’t use PWM, only speed control. Also the Bricktronics Shield’s use of PWM pins 9 and 10 is connected right to the speed input pins on the L293D so everything will work just fine. If you’re using a normal NXT/EV3 servo motor with the shield, you should be able to use the BricktronicsMotor library without any trouble.

For your specific application, you could replace the delay(1000); lines above with a while loop that polls the pushbuttons to detect when the rack reaches each end.

It does work fine, I feel such a putz

The very low settings don’t output any rotation < 110 no rotation (using PP3 9V as external power)

Must have been going too low, or too close to 255 to notice any difference.

Will have to definitely get a mains poser supply to give me more umph!

Oh great, I’m glad it’s working for you now. I probably should create an introduction tutorial to explain how the new software libraries work with the hardware.

The motors take more current than you would expect for their size. Typically 600 mA at full-speed with no load, but it can spike over 1000 mA when you add a load. Good luck!

Putting it all together, but having issues with button 2.

I tested motor forwards & backwards, and it was fine. Tested LED swap interrupt, worked fine.

Incorporating buttons, button 1 works (& reverses direction of motor), button 2 doesn’t. Code got me going all googly-eyed.

Can’t see, what is probably very obvious.

// Include the Bricktronics libraries
#include <BricktronicsShield.h>
#include <BricktronicsMotor.h>
#include <BricktronicsButton.h>

#define ledPin1 12
#define ledPin2 13
int timerCounter= 0;

unsigned long previousMillis = 0; // will store last time clock was updated
unsigned long currentMillis = 0;

// Attach motor and sensors to Bricktronics sheild
BricktronicsButton b1(BricktronicsShield::SENSOR_1);
BricktronicsButton b2(BricktronicsShield::SENSOR_2);
BricktronicsMotor m(BricktronicsShield::MOTOR_1);

void setup() {

pinMode(12, OUTPUT);
pinMode(13, OUTPUT);
digitalWrite(12, HIGH);

// Be sure to set your serial console to 115200 baud
Serial.begin(115200);

// Initialize the Bricktronics Shield
BricktronicsShield::begin();

// Initialize the button connection
b1.begin();
b2.begin();
m.begin();

// initialize timer1
noInterrupts(); // disable all interrupts
TCCR1A = 0;
TCCR1B = 0;
// Set timer1_counter to the correct value for our interrupt interval
timerCounter = 0; // preload timer 65536-16MHz/256/2Hz

TCNT1 = timerCounter; // preload timer
TCCR1B |= (1 << CS12); // 256 prescaler
TIMSK1 |= (1 << TOIE1); // enable timer overflow interrupt
interrupts(); // enable all interrupts
}

// interrupt service routine
ISR(TIMER1_OVF_vect){

if (timerCounter == 10) { // preload timer

digitalWrite(ledPin1, digitalRead(ledPin1) ^ 1);
digitalWrite(ledPin2, digitalRead(ledPin2) ^ 1);
previousMillis = currentMillis;
timerCounter = 0;

}
timerCounter++;
}

int motorSpeed = -170;

void loop() {

m.setFixedDrive(motorSpeed);
currentMillis = millis();

// Wait until button 1 is pressed
while (b1.isReleased()) { // Nothing to do here
}
// To get here, the button was pushed!

// In order to debounce the button, we transmit a message on the serial
// port and then wait a little bit longer here.
Serial.println(“b1 pressed”);
delay(100);

// Reverse direction
motorSpeed *= -1;
Serial.println(motorSpeed);
m.setFixedDrive(motorSpeed);

// Wait until button 1 is released
while (b1.isPressed()) { // Nothing to do here
}

// In order to debounce the button, we transmit a message on the serial
// port and then wait a little bit longer here.
Serial.println(“b1 released”);
delay(100);

// Wait until button 2 is pressed
while (b2.isReleased()) { // Nothing to do here
}
// To get here, the button was pushed!

// In order to debounce the button, we transmit a message on the serial
// port and then wait a little bit longer here.
Serial.println(“b2 pressed”);
delay(100);

// Reverse direction
motorSpeed *= -1;
m.setFixedDrive(motorSpeed);
Serial.println(motorSpeed);

// Wait until button 2 is released
while (b2.isPressed()) { // Nothing to do here
}

// In order to debounce the button, we transmit a message on the serial
// port and then wait a little bit longer here.
Serial.println(“b2 released”);
delay(100);

}

Hello, that code looks pretty straightforward, nice work. So you’re using the timer1 overflow interrupt just to toggle two LEDs, and the motor/button parts aren’t affected by the interrupt, right?

When the button 2 is misbehaving, what sort of behavior do you see? Do you see any interesting printouts? Does it not detect the b2 press?

After reading through the code once, I can’t see anything that looks obviously wrong. Have you confirmed that your button 2 is working correctly? You could test it with one of the BricktronicsButton example sketches, or you could swap the cables to b1 and b2.

Timer is just to toggle LEDs.

Swapped buttons around, other button then displayed same behaviour. Below is output from debugging serial.print statements:

b1 pressed
-200
b1 released
b2 pressed
200
b2 released
b1 pressed
-200
b1 released
b2 pressed
200
b2 released
b1 pressed
-200
b1 released
b2 pressed
200
b2 released
b1 pressed
-200
b1 released
b2 pressed
200
b2 released
b1 pressed
-200
b1 released

When speed changes to -200 motor stops.

If I manually move traverse to press button 2 (speed = +200) motor starts again.

Thanks for the info. Based on the debugging log it looks like both buttons are working correctly, but something is preventing the motor from running in reverse?

One thing I just thought of is that the BricktronicsMotor library uses the arduino function analogWrite to set up the PWM output for the motor speed signals on pins 9 and 10. Since these pins belong to timer 1, there may be a conflict between your timer1 code and the analogWrite code. Given this conflict, I would have expected your LED interrupt to stop working after the library uses analogWrite to reconfigure the PWM, but maybe analogWrite just adjusts the compare registers to adjust the PWM duty cycle and doesn’t mess with the overall timer frequency or overflow interrupt (which you are using for the LEDs).

You might try moving your LED timer code to timer2 instead of timer1?

One easy thing to check would be to comment-out your timer1 code to see if that resolves the “motor can’t run backwards” issue. If that doesn’t work, please try the MotorSingleBricktronicsShield example by itself to confirm that your shield can run the motor forwards and backwards without issue. https://github.com/wayneandlayne/BricktronicsMotor/blob/master/examples/MotorSingle/MotorSingleBricktronicsShield/MotorSingleBricktronicsShield.ino

The conflict was causing the problem, so I’ll need to re-write using timer 2.

Changed to the code below, and this works! Hurrah!

// Include the Bricktronics libraries
#include <BricktronicsShield.h>
#include <BricktronicsMotor.h>
#include <BricktronicsButton.h>

#define ledPin1 12
#define ledPin2 13
int timerCounter= 0;

unsigned long previousMillis = 0; // will store last time clock was updated
unsigned long currentMillis = 0;
unsigned long buttonOneMillis = 0; // Store when Button 1 was last pressed
unsigned long buttonTwoMillis = 0; // Store when Button 2 was last pressed

// Attach motor and sensors to Bricktronics sheild
BricktronicsButton b1(BricktronicsShield::SENSOR_1);
BricktronicsButton b2(BricktronicsShield::SENSOR_2);
BricktronicsMotor m(BricktronicsShield::MOTOR_1);

int motorSpeed = 255;

void setup() {

pinMode(12, OUTPUT);
pinMode(13, OUTPUT);
digitalWrite(12, HIGH);

// Be sure to set your serial console to 115200 baud
Serial.begin(115200);

// Initialize the Bricktronics Shield
BricktronicsShield::begin();

// Initialize the button connection
b1.begin();
b2.begin();
m.begin();
/*
// initialize timer1
noInterrupts(); // disable all interrupts
TCCR1A = 0;
TCCR1B = 0;
// Set timer1_counter to the correct value for our interrupt interval
timerCounter = 0; // preload timer 65536-16MHz/256/2Hz

TCNT1 = timerCounter; // preload timer
TCCR1B |= (1 << CS12); // 256 prescaler
TIMSK1 |= (1 << TOIE1); // enable timer overflow interrupt
interrupts(); // enable all interrupts
/
noInterrupts(); // disable all interrupts
TCCR2A = 0;
TCCR2B = 0;
TCNT2 = 101; // preload timer 256- 16MHz/(1024
100Hz) //timer frequancy is 100Hz
TCCR2B |= (1 << CS12);
TCCR2B |= (1 << CS10); // 1024 prescaler
TIMSK2 |= (1 << TOIE2); // enable timer overflow interrupt
interrupts(); // enable all interrupts

m.setFixedDrive(motorSpeed);
}

// interrupt service routine
ISR(TIMER2_OVF_vect){

if (timerCounter == 10000) { // preload timer

digitalWrite(ledPin1, digitalRead(ledPin1) ^ 1);
digitalWrite(ledPin2, digitalRead(ledPin2) ^ 1);
previousMillis = currentMillis;
timerCounter = 0;

}
timerCounter++;
}

void loop() {

Serial.println(motorSpeed);
currentMillis = millis();

// Wait until button 1 is pressed
while (b1.isReleased()) { // Nothing to do here
}
// To get here, the button was pushed!

// In order to debounce the button, we transmit a message on the serial
// port and then wait a little bit longer here.
Serial.println(“b1 pressed”);
delay(100);

// Reverse direction
motorSpeed *= -1;
//Serial.println(motorSpeed);
m.setFixedDrive(motorSpeed);

// Wait until button 1 is released
while (b1.isPressed()) { // Nothing to do here
}

// In order to debounce the button, we transmit a message on the serial
// port and then wait a little bit longer here.
Serial.println(“b1 released”);
delay(100);

// Wait until button 2 is pressed
while (b2.isReleased()) { // Nothing to do here
}
// To get here, the button was pushed!

// In order to debounce the button, we transmit a message on the serial
// port and then wait a little bit longer here.
Serial.println(“b2 pressed”);
delay(100);

// Reverse direction
motorSpeed *= -1;
m.setFixedDrive(motorSpeed);
//Serial.println(motorSpeed);

// Wait until button 2 is released
while (b2.isPressed()) { // Nothing to do here
}

// In order to debounce the button, we transmit a message on the serial
// port and then wait a little bit longer here.
Serial.println(“b2 released”);
delay(100);

}

Just need to get the scale correct for timer. Phew!

Well hey that is excellent! Another approach you could consider is to avoid using interrupts at all, and instead make your ISR into a function that should be called as often as possible from the main code. Something like this:

void checkLeds(void) {
    static unsigned long nextLedUpdateTimeMs = 0;
    // "static" means it's only assigned to 0 the first time this is called

    if (millis() > nextLedUpdateTimeMs) {
        // Time to update the LEDs
        digitalWrite(ledPin1, digitalRead(ledPin1) ^ 1);
        digitalWrite(ledPin2, digitalRead(ledPin2) ^ 1);
        nextLedUpdateTimeMs += 10000; // 10 seconds between updates
    }
}

Then in the code in loop() just call this function inside the while loops like this:

// Wait until button 1 is pressed
while (b1.isReleased()) {
    // ensure that the LEDs are properly updated
    checkLeds();
}

For the delay(100) calls, you can rewrite them to be something like this:

unsigned long endTimeMs = millis() + 100;
while (millis() < endTimeMs) {
    // ensure that the LEDs are properly updated
    checkLeds();
}

This should enable the LEDs to update periodically without having to use interrupts. Hope that helps!

Thought I’d run a test with the code you sent against the interrupt (set with a timer loader of 4882) and got the following results:

Using interrupt :
Interrupt Time:10002
Interrupt Time:20000
Interrupt Time:29999
Interrupt Time:39997
Interrupt Time:49995
Interrupt Time:59994
Interrupt Time:69992

Using millis() for delay:

Check LEDs Time:7
Check LEDs Time:10001
Check LEDs Time:20001
Check LEDs Time:30001
Check LEDs Time:40001
Check LEDs Time:50001
Check LEDs Time:60001

Impressive accuracy for the millis() calls, so I’ll probably go with that as it’s more accurate (by a few milliseconds).

If you want the full code reply. Would like to have a scrolling window, but unsure of how to paste in that way.

That’s a pretty good result, I like it! I’m also not sure how to easily make a scrollable window with monospace font for code samples, but you could always post the code to pastebin (https://pastebin.com/) and post a link here.

Good luck with the rest of your project, let us know if you have any more questions!