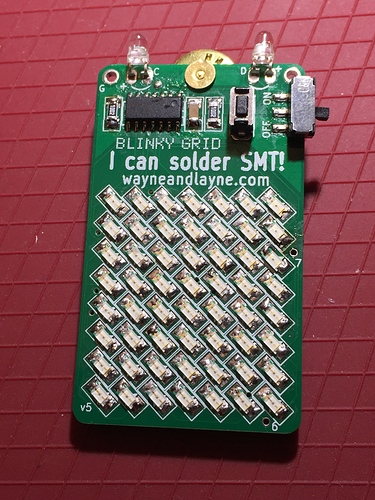
I have everything soldered up, diode tested that all of the LEDs are working, pic direction seems OK… Not sure what’s up. Laid down extra solder… How do I troubleshoot from here? Look up the chip specs?
Hello, thanks for the message, sorry it’s not working right.
Do you have a voltage meter? That will be the most useful tool for debugging your kit. Doesn’t need to be anything fancy, just able to measure voltages between 0 and 5v.
You can connect the black lead of the volt meter to the hole labeled “G” in the upper-left corner of the board. This is a convenient ground (0v) connection point. Then, use the read lead to measure the voltages at these points:
A. The upper pin of the slide switch on the right side of the board (nearby text says ON). This should be around 3.3 volts, and is the raw battery voltage.
B. With the switch in the on position, measure the voltage at the middle pin of the slide switch. When the switch is on, it should be the same voltage as the upper pin.
C. Keep the switch on for the rest of these measurement. Next measure the voltage at the upper-right pin of the black chip. This is pin 1, and should have the same voltage as the battery.
D. Pin 4 of the chip (middle pin on the row nearest the top edge of the board). This is the reset pin, and it should be near the battery voltage. If it’s near 0 volts, then it will keep resetting the chip.
Let me know how those voltages look, and we’ll figure out what’s going wrong.
The battery and switch pins (on) read 3.0V, chip pin 1 reads 0.36V, and pin 4 is 0.0V.
I figured, as a first step, that first pin might not be contacting perfectly so I put some extra solder down and lo and behold - she’s alive. Hopefully the other pins are also good. For the optical programming, for example.
If I have weird problems, how do I know what voltages I should be seeing?
Excellent, I’m glad you were able to get it going. Are the LEDs all lighting up? The default set of pre-programmed messages has a pair of checkerboards as the first message, so that should help diagnose that all LEDs are working.
Here’s the Blinky Grid SMT schematic for your reference: https://www.wayneandlayne.com/files/blinky/downloads/blinky_grid_smt-schematic-v1.04.png
For the optical programming, here’s the animated GIF programming guide: http://www.wayneandlayne.com/files/blinky/images/programming_animated_gif/blinky_programming.gif
The second half of this page has some troubleshooting info: https://www.wayneandlayne.com/projects/blinky/faq/
When programming, if the kit flashes LEDs 3/4, that means it had a checksum error caused by receiving incorrect data (so double-check the data sensor connections). If the webpage programming ends and the kit isn’t doing anything, that indicates it missed some clock transitions and thinks there is more data to come, so check the clock sensor connections.
If you put the kit into bootloader mode (hold pushbutton when you turn on the power) you can test the sensors. Measure the voltage at each sensor lead. One lead of each sensor should be the battery voltage, and the other lead is the voltage measured by the chip. Measure the voltage at the non-battery-voltage pin, while you point the sensor at a white spot and a black spot on your computer display. You should see a higher voltage for the white spot, and a lower voltage for the black spot.
